Tutorial lengkap membuat tool PageSpeed Tester yang aman dan gratis untuk blog Blogger Anda. Tool ini menggunakan Google PageSpeed Insights API dengan Cloudflare Worker sebagai proxy untuk menyembunyikan API key.
Apa yang Akan Anda Buat
Tool yang bisa:
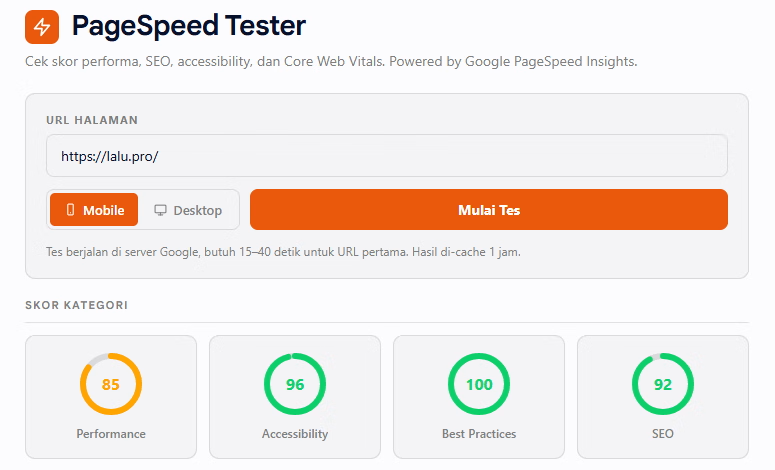
Cek skor Performance, Accessibility, Best Practices, dan SEO halaman manapun
Tampilkan Core Web Vitals (FCP, LCP, TBT, CLS, dll)
Berikan rekomendasi perbaikan diurutkan berdasarkan impact
Cache hasil 1 jam untuk hemat quota
100% gratis (Google API quota gratis cukup untuk blog normal)
Mengapa Butuh Cloudflare Worker?
API Google butuh API key untuk akses unlimited. Kalau key disimpan langsung di JavaScript blog Anda:
Key terlihat di view-source dan Network tab browser
Siapa saja bisa copy key Anda
Pakai untuk panggil API mereka sendiri
Quota Anda habis, atau worse — kena billing kalau key Anda attach ke service berbayar
Solusi: Simpan key di Cloudflare Worker (server). Tool browser hanya panggil Worker, Worker yang panggil Google API.
Browser (tool Anda) → Cloudflare Worker (key di sini) → Google PageSpeed API
Key tidak pernah keluar dari server. Aman.
Prasyarat
Sebelum mulai, siapkan:
Akun Google (untuk Google Cloud Console)
Akun Cloudflare (gratis, daftar di cloudflare.com)
Blog Blogger Anda
Tidak perlu credit card untuk setup ini.
STEP 1: Dapatkan Google API Key
1.1 Aktifkan PageSpeed Insights API
Buka Google Cloud Console
Buat project baru (atau pilih yang sudah ada)
Di sidebar kiri: APIs & Services → Library
Search: "PageSpeed Insights API"
Klik hasil, lalu Enable
1.2 Buat API Key
APIs & Services → Credentials
Create Credentials → API key
Key baru muncul. Copy key tersebut dan simpan sementara di Notepad/text editor
Klik Edit API key untuk setup restriction
1.3 Set Restriction (Sangat Penting!)
Tanpa restriction, key bisa dipakai siapa saja yang punya key tersebut.
Application restrictions:
Pilih Websites
Klik Add an item
Isi domain Anda:
*.laluabdrahman.com*(ganti dengan domain Anda)https://laluabdrahman.com/*https://www.laluabdrahman.com/*
API restrictions:
Pilih Restrict key
Centang hanya "PageSpeed Insights API"
Klik Save
Tips keamanan: Restriction ini berarti key Anda tidak bisa dipakai dari domain lain ATAU untuk API Google lain (Maps, Translate, dll yang berbayar).
STEP 2: Deploy Cloudflare Worker
2.1 Buat Worker Baru
Login ke Cloudflare dashboard
Sidebar kiri: Workers & Pages
Klik Create application → Create Worker
Beri nama, misal:
pagespeed-proxyKlik Deploy (dengan default code)
Setelah deploy, klik Edit code
2.2 Paste Kode Worker
Hapus semua default code, paste kode berikut:
export default {
  async fetch(request, env, ctx) {
    // CORS preflight
    if (request.method === 'OPTIONS') {
      return new Response(null, { status: 204, headers: corsHeaders() });
    }
    if (request.method !== 'GET') {
      return errorResponse('Only GET allowed', 405);
    }

    const url = new URL(request.url);
    const targetUrl = url.searchParams.get('url');
    const strategy = (url.searchParams.get('strategy') || 'mobile').toLowerCase();

    if (!targetUrl) {
      return errorResponse('Missing url parameter', 400);
    }
    if (!['mobile', 'desktop'].includes(strategy)) {
      return errorResponse('strategy must be mobile or desktop', 400);
    }

    // Validate target URL
    let target;
    try {
      target = new URL(targetUrl);
    } catch (e) {
      return errorResponse('Invalid URL format', 400);
    }
    if (!['http:', 'https:'].includes(target.protocol)) {
      return errorResponse('Only http(s) protocol allowed', 403);
    }

    // SSRF prevention
    const hostname = target.hostname.toLowerCase();
    if (['localhost', '127.0.0.1', '0.0.0.0', '::1'].includes(hostname) ||
        /^10\./.test(hostname) ||
        /^172\.(1[6-9]|2\d|3[01])\./.test(hostname) ||
        /^192\.168\./.test(hostname) ||
        /^169\.254\./.test(hostname)) {
      return errorResponse('Hostname not allowed', 403);
    }

    if (!env.GOOGLE_API_KEY) {
      return errorResponse('Worker not configured: missing GOOGLE_API_KEY secret', 500);
    }

    // Cache check
    const cacheKey = new Request(
      `https://psi-cache.internal/${strategy}/${encodeURIComponent(target.href)}`,
      { method: 'GET' }
    );
    const cache = caches.default;
    let cached = await cache.match(cacheKey);
    if (cached) {
      const newHeaders = new Headers(cached.headers);
      newHeaders.set('X-PSI-Cache', 'HIT');
      return new Response(cached.body, { status: cached.status, headers: newHeaders });
    }

    // Call Google PageSpeed API
    const apiUrl = new URL('https://www.googleapis.com/pagespeedonline/v5/runPagespeed');
    apiUrl.searchParams.set('url', target.href);
    apiUrl.searchParams.set('strategy', strategy);
    ['performance', 'accessibility', 'best-practices', 'seo'].forEach(cat => {
      apiUrl.searchParams.append('category', cat);
    });
    apiUrl.searchParams.set('key', env.GOOGLE_API_KEY);

    try {
      const controller = new AbortController();
      const timeoutId = setTimeout(() => controller.abort(), 60000);

      // GANTI Referer di bawah dengan domain blog Anda
      const apiRes = await fetch(apiUrl.toString(), {
        headers: { 'Referer': 'https://www.laluabdrahman.com/' },
        signal: controller.signal
      });
      clearTimeout(timeoutId);

      if (!apiRes.ok) {
        let errMsg = `Google API returned HTTP ${apiRes.status}`;
        try {
          const errBody = await apiRes.json();
          if (errBody.error?.message) errMsg = errBody.error.message;
        } catch (e) {}
        return errorResponse(errMsg, apiRes.status === 429 ? 429 : 502);
      }

      const data = await apiRes.json();
      const response = new Response(JSON.stringify(data), {
        status: 200,
        headers: {
          ...corsHeaders(),
          'Content-Type': 'application/json',
          'Cache-Control': 'public, max-age=3600',
          'X-PSI-Cache': 'MISS'
        }
      });

      ctx.waitUntil(cache.put(cacheKey, response.clone()));
      return response;
    } catch (err) {
      if (err.name === 'AbortError') {
        return errorResponse('PageSpeed API timeout (>60s)', 504);
      }
      return errorResponse('Fetch failed: ' + err.message, 502);
    }
  }
};

function corsHeaders() {
  return {
    'Access-Control-Allow-Origin': '*',
    'Access-Control-Allow-Methods': 'GET, OPTIONS',
    'Access-Control-Allow-Headers': 'Content-Type'
  };
}

function errorResponse(message, status) {
  return new Response(JSON.stringify({ error: message }), {
    status,
    headers: { ...corsHeaders(), 'Content-Type': 'application/json' }
  });
}
PENTING: Cari baris
'Referer': 'https://www.laluabdrahman.com/'dan ganti dengan domain Anda. Ini harus match dengan restriction key di Google Cloud Console.
Klik Save and deploy.
2.3 Tambah API Key sebagai Secret
Sekarang masukkan API key Anda ke Worker sebagai secret (encrypted):
Di Worker → tab Settings
Scroll ke section Variables and Secrets
Klik + Add
Isi:
Type:
Secret(penting! bukan Text)Variable name:
GOOGLE_API_KEY(case-sensitive, persis seperti ini)Value: paste API key dari Step 1.2
Klik Save
Catatan: Setelah secret ditambahkan, Worker mungkin perlu di-redeploy. Buka tab Deployments, kalau tidak ada deployment baru otomatis, edit kode dan save lagi (tambah satu spasi lalu hapus juga cukup).
2.4 Test Worker
Buka di browser:
https://pagespeed-proxy.YOUR-NAME.workers.dev/?url=https://example.com&strategy=mobile
Ganti YOUR-NAME dengan subdomain Worker Anda.
Expected:
Tunggu 15-40 detik
Lihat JSON besar muncul dengan field
lighthouseResultJika ada error, baca pesan dan cek troubleshooting di bawah
Catat URL Worker Anda — akan dipakai di Step 3.
STEP 3: Setup Tool HTML di Blogger
3.1 Edit Konfigurasi Tool
Buka file pagespeed-tester.html Anda. Cari baris ini (sekitar baris 510):
const WORKER_URL = '';
Ganti dengan URL Worker Anda:
const WORKER_URL = 'https://pagespeed-proxy.YOUR-NAME.workers.dev/';
3.2 Paste ke Blogger
Blogger dashboard → Pages → New Page
Klik mode HTML view (bukan Compose)
Paste seluruh isi file
pagespeed-tester.htmlBeri title halaman: "PageSpeed Tester"
Publish
3.3 Test Tool
Buka halaman yang baru dipublish, lalu:
Input URL, contoh:
https://example.comPilih Mobile atau Desktop
Klik Mulai Tes
Tunggu 15-40 detik
Hasil muncul dengan score rings, Core Web Vitals, dan rekomendasi
Cache test:
Klik Mulai Tes lagi dengan URL dan strategy sama
Harusnya muncul <1 detik dari cache
Footer berubah jadi: "✓ dari cache"
Troubleshooting
Error: "Worker not configured: missing GOOGLE_API_KEY secret"
Secret belum tersimpan atau Worker belum redeploy. Solusi:
Cek di Settings → Variables and Secrets, pastikan ada
GOOGLE_API_KEY(case-sensitive)Pastikan Type-nya Secret, bukan Text
Edit kode Worker, save lagi untuk trigger redeploy
Error: "Requests from referer <empty> are blocked"
API key Anda di-restrict ke domain, tapi Worker tidak kirim Referer header.
Solusi: Pastikan di kode Worker ada baris ini di dalam fetch() ke Google API:
headers: { 'Referer': 'https://www.YOUR-DOMAIN.com/' }
Domain di sini harus match dengan salah satu restriction di Google Cloud Console.
Tombol "Mulai Tes" tidak respon
Buka Developer Console (F12 → Console), lihat error apa yang muncul.
Cek juga:
WORKER_URLsudah diisi dengan URL Worker AndaURL Worker bisa diakses langsung di browser
Error: "HTTP 429" (Too Many Requests)
Rate limit dari Google. Tunggu 1-2 menit, lalu coba lagi. Atau:
Pastikan API key sudah terkonfigurasi dengan benar
Caching seharusnya mengurangi request rate
Hasil PageSpeed berbeda dari pagespeed.web.dev
Normal. Score PageSpeed bisa fluktuasi 5-10 point antar test karena:
Variasi network condition di server Google
Random sampling dari data CrUX (Chrome User Experience Report)
Cache TTL yang berbeda
Untuk benchmark akurat, jalankan test 3-5 kali dan ambil median.
Quota dan Biaya
Google PageSpeed Insights API
25,000 query per hari gratis
Cukup untuk blog normal — bahkan dengan caching off
Tidak perlu billing setup
Cloudflare Workers
100,000 request per hari gratis (free tier)
10ms CPU time per request (kita pakai jauh lebih sedikit)
Cache pakai Cloudflare Cache API (built-in, gratis)
Estimasi penggunaan blog dengan 1,000 visitor/hari
Asumsi: 1% visitor pakai tool = 10 test/hari
Resource | Limit | Penggunaan |
|---|---|---|
Cloudflare Workers | 100k/hari | 10 req |
Google API | 25k/hari | 10 req |
Cache hit rate | - | ~30% (URL repeat) |
Penggunaan masih jauh di bawah free tier. Aman untuk blog dengan trafik wajar.
Cara Kerja Detail
Arsitektur Defense in Depth
Tool ini punya 5 layer keamanan:
Key disembunyikan di Worker secret — encrypted di Cloudflare, tidak visible di dashboard setelah disimpan
API restriction di Google — key hanya bisa pakai PageSpeed Insights API, bukan Maps/Translate yang berbayar
Website restriction di Google — referer harus match domain Anda
Worker forward referer — memungkinkan website restriction bekerja meski request datang dari Cloudflare IP
SSRF prevention di Worker — block private IP dan localhost di parameter URL
Kalau salah satu layer compromised, layer lain masih protect:
Key bocor → masih di-restrict ke PageSpeed Insights API only
Restriction lemah → key tetap tidak visible di browser
Cache Strategy
Worker pakai Cloudflare Cache API (built-in, no setup):
Cache key:
URL + strategyTTL: 1 jam (3600 detik)
Storage: Cloudflare edge, automatic eviction
Mobile dan Desktop terhitung cache terpisah. Cache di-share antar visitor — jadi kalau 100 orang test URL sama, hanya 1 yang fresh fetch, sisanya dari cache.
Kenapa Hasil Pertama Lambat?
Google PageSpeed API actually menjalankan Lighthouse audit di server mereka — load page, render, simulate user interaction, analyze. Itu butuh 15-40 detik. Tidak bisa diakselerasi.
Setelah cache, hasil instan karena tidak perlu re-audit.
Kesimpulan
Anda sekarang punya tool PageSpeed Tester sendiri yang:
Gratis sampai 25k test/hari (jauh di atas kebutuhan blog normal)
Aman — API key tidak pernah terlihat publik
Cepat untuk repeat test (cache 1 jam)
Customizable — bisa modify UI, tambah fitur, dll
Tool ini juga jadi foundation pattern untuk tool lain yang butuh API key. Misalnya kalau Anda mau buat:
Image Alt Text Generator (pakai OpenAI/Claude API)
SERP Checker (pakai SerpApi)
Backlink Checker (pakai Ahrefs API)
Polanya sama: Worker proxy + secret env variable.
Selamat mencoba!
Bagaimana pendapat Anda mengenai topik ini? Mari bagikan perspektif Anda di bawah!
Recommended Comments